ClockReports XE Help Guide - Hardware
Setup Steps: IP Address Setup on Device
![]()
![]()
![]()
SUMMARY
Configuring the network settings directly on the time clock device using the
keypad and LCD display.
Steps below describe procedure on the following models: A300, EP300, OC500,
TC550, VF30, VP30, T60 - Version 2 models with TI chipset.
Tip: After changing your network settings always restart or power down
your device so that the settings can take effect on next power up.
Note: When the time clock is brand new with factory settings, it allows anyone to access the menu options by pressing the M Key, however once users and fingerprints are enrolled, any of these users can be added as an Admin Manager, once a manager is added to the time clock, only an admin manager is able to unlock the menu in the future. (The time clock can have one or multiple managers).
OVERVIEW
- How to configure network IP addresses from the time clocks keypad.
In order to establish a network connection the correct IP address must be configured on the time clock as follows:
Turn on the time clock by pressing the OK/Power key.
Press the M key (menu). - Pressing the M key will open the time clock menu options.
Using the arrow keys ← → select SETUP, and then press OK.
Using the arrow keys ← → select SYSTEM, and then press OK.
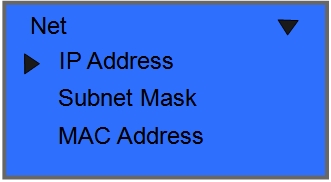
Using the arrow keys ← → select NET, and then press OK.
Now enter the correct IP configuration using the keypad on the time clock.
To be able to configure each one of the following IP settings simply highlight it, and then press OK, then enter the desired settings and press OK.
Once the IP address has been entered, press the C key (ESC or Escape key) then OK to save, and a confirmation will follow.
Mode: Server or Client - In ‘Server mode’ the PC will establish a connection to time clock. In ‘Client mode’ the Time Clock will establish a connection to a PC with fixed IP address.
IP Address: Enter the time clocks IP address.
Subnet Mask: Enter the mask number of the network where the time clock will be connected to.
MAC Address: Do not make changes on this field as this is the unique network identifier for the time clock.
Gateway IP: Enter the gateway IP or router of the network where the time clock will be connected to.
Server IP: Fixed IP address of PC which is running ClockReports machine manager.
Note: Every network is different and may have different security restrictions and firewall settings. If you need help setting up the IP addresses, we highly suggest requesting support from the network administrator or IT department in your company.